Monday 26 October 2015

INSPIRATION FOR FINAL DESIGN - USING BABY HAIR TO CREATE CURLS

I absolutely love this idea of creating curls with baby curls I think this would fit well with my previous design to make it more contemporary and instead of creating the curls on top of the hair i could actually create a few on the forehead to give it a fashion vibe. I had a go at creating them but found it difficult to stick them down. After researching and finding some videos I am definitely going to practise more.


FKA TWIGS
 FKA Twigs was definitely my main inspiration for this hairstyle, she is know for using to gel on her baby hair and creating shapes with them. Tahliah Debrett Barnett, also known by her stage name FKA Twigs is a British singer, songwriter, producer and dancer. She is definitely a fashion icon for her stand out unusual style and I would love to use her as my inspiration for my final design.

How to get FKA's baby hair kiss curls

How to create baby hair edges

FKA Twigs Wikipedia


MODERN ELIZABETHAN HAIR INSPIRATION


MODERN ELIZABETHAN HAIR- TECHNICAL

I actually found coming up with a design for the modern elizabethan hair really difficult. I looked at a number of images for inspiration from fashion to theatre to editorial, but none of them really caught my eye as anything special. I did really like a photo I found where it was two really large buns on the head which was quite simple but looked really good, unfortunately I could create this at all on my dolls head, but I am going to try doing it on a person. Instead I decided to create my design around plaits as I find it inspiring that plaits were used all the way back in Elizabethan times and are still used in the same way now. I wanted to create a design that was quite quirky but still showed Elizabethan in the some way. 
 I started by sectioning the hair and creating two really tight braids in the front, going from either side of the ear. I then decided to plait straight down the back of the hair creating a parting with the braid. I knew middle partings were very popular in the Elizabethan Era so I thought it could be a cool concept. After plaiting I really struggled with how to create a heart shape with the rest of the hair without covering the plait in the middle. I tried a few ways including rolling the hair in sections, back combing and creating just one section, I also tried put the hair over the plait and having it peak out in just certain places. None of them looked how I wanted them to. I then sectioned the hair in small part and back combed, I used two pieces of hair and crossed them over the plait gripping in the middle to create that heart shape. After that I was able to grip the other parts in place one by one layering them to look like a heart at the back.
I quite like how my design turned out but I actually liked the way it looked better from the back view. From the front it didn't really have the look I wanted it to and didn't have much volume on top of the head. I do want to try this look again on a person and maybe use some padding to get the heart shape slightly bigger and more prominent. I do like the concept of the plait being used as a middle parten and I would like to try this in different styles.

Thursday 22 October 2015

CREATING AN ELIZABETHAN HAIRSTYLE ON A PERSON- TECHNICAL

Today we had to work on a person for the first time, I decided to try and create the same design I had previously done on my doll's head to see if it would be more difficult. Using the same techniques as before I sectioned the front and then started on the back of the hair. This time I crimped the hair to create texture, I then brushed it out to give a frizzed effect. I then back combed the hair and sectioned into three parts. Using the top two parts I rolled them into a heart shape and gripped them into place. I decided to try a different technique at the back rather than the bun and rolled the hair under to create two rolls. Helen's hair was a lot shorter than the doll's head which is why I had to try something else rather than a bun as I wouldn't of got the large bun that i had previously creates. The rolls created really well because it made it look as if her hair was really thick. 
 I then started creating the small curls at the front of the hair, I found this part really difficult as Helen's hair already had quite a lot of product in and natural oils coming through. This made it hard to pick up the curls and get them as precise and defined as I wanted them. The hair at the front was quite thin compared to the doll's head meaning I couldn't create as many curls as I wanted to. I still like the way the hair turned out and I actually like that the curls are hidden slightly and not as noticeable. If I was to do it again i would have to take more hair from the front of the head to be able to create more curls.

Wednesday 21 October 2015

CREATING AN ELIZABETHAN HAIRSTYLE- TECHNICAL

In this lesson we were asked to create an Elizabethan Hairstyle, this was the first time we were really creating a full hairstyle and having our own creative freedom. I decided to do some research before hand and find a portrait that caught my eye. I liked the detail in this portrait I found of Queen Elizabeth, and all of the tiny little curls at the front of the hair. I decided to try to recreate something similar to this...

I actually wanted to see how the curls would look bigger so I decided to do two rolls of curls, I started by sectioning the front so I knew which part I was using for the little curls. I then started doing the back of the hair using back combing to create height and then put the rest of the hair into a bun. When creating the curls at the front I took small sections and curled them around my fingers creating a roll, I then pressed them flat onto the head and gripped them in place. Unfortunately in the end the grips were very noticeable so next time I want to try using the really thin pins as in photographs I know the grips would show up. I really love how my look turned out although I would like to try doing even smaller curls and make them really neat. I would also have crimped the rest of the hair to add texture if I had more time. Also I would like to try using product on the curls to make them a lot smoother and prominent and less frizzy.  

Tuesday 6 October 2015

PADDING- RESEARCH

In Elizabethan times padding was used to create the extreme hairstyles and height that you can see in the portraits. It helped to create the round and heart shapes to the head and was then covered with hair to hide the padding. It also meant you didn't need a lot of hair to be able to create the huge hairstyles, which was a good thing back then as the hair was really damaged from the bleaching and products they used. 

Padding is still used now mainly for avant garde shoots and theatre, it isn't used much in everyday situations but more for dramatic hairstyles. The only form of padding that is used in everyday situations is a bun ring, people will use this to create the perfect bun shape and they are really popular in the dance industry. I find it interesting that padding is still used to this day and been used to create the most unusual, crazy hairstyles.


PADDING- TECHNICAL

In this lesson we learnt how to use padding to create a hairstyle. I decided to do one side of the hair without padding and just using back combing and one side with padding to be able to see the difference and which one I preferred. 

To create the first half without padding I simply took a section of the hair from the scalp down to meet the ear, I then back combed making sure I only pushed my comb down towards the scalp neatly and not back and forth otherwise the hair would get tangled and snap. I then smoothed the front of the hair and rolled the hair into the shape I wanted it to be in. I then used grips to secure the hair into place. I really liked how this side turned out and think I got the volume and shape I wanted. 
For the side with the padding, I parted the hair in the same way and then took a piece of padding, which in this case was paper scrunched up inside some tights. I then started from the bottom of the hair and rolled it to the top of the head so that the hair was completely covering the padding and then gripped it into place. I don't think this technique worked very well as the padding was quite stiff so it was difficult to get the shape you wanted. Also it was a lot harder to make the padding not visible.
In the past I have used padding which was made up of pillow stuffing and wrapped in a hairnet, I liked this better as it was soft and I was able to shape it however I wanted to. I do like using padding but I for a photoshoot I think I will be fine using backcombing. If I was doing a hairstyle for theatre I would consider using padding as it would help the hairstyle stay in for longer and make it more structured and dramatic.

CURLS AN FRIZZ-RESEARCH

In most portraits of Elizabethans you can tell they have some sort of .texture the hair which usually looks like crimping. Frizzy hair was definitely something everyone wanted and mainly because Queen Elizabeth had it. The frizzy hair made it a lot easier to style and get the volume that was needed.

I find it really strange that people desired for frizzy hair as in modern day life people are trying their best to get rid of frizz and numerous products have been brought out to try and fight frizz and create smooth sleek hair. Although I do love frizzy curly hair many people dislike it and would prefer to have straight hair. 

CURLS AND FRIZZ- TECHNICAL

In today's lesson we learnt how to create texture to the hair using crimping. The technique was pretty easy, we had to section the hair in to small parts and apply the crimpers to each section holding it for a short amount of time. I loved how quickly the crimpers worked. Once we had completed the whole hair we then brushed it out which gave a frizzed effect similar to the hair in the Elizabethan times. It also made the hair a lot more voluminous making it easier to structure. I really like this technique and thought it worked really well and the finish once it was in a style looked just like frizzy hair rather than being crimped and the texture was a lot easier to work with than very straight hair.

HAIR ADORNMENTS- TECHNICAL

In today's lesson we learnt about hair adornments and accessories. These were both very popular in the Tudor times and actually represented wealth and royalty.

First I created a quick Elizabethan hairstyle so that I could accessorize the hair similar to how they would. I created a heart shape using back combing and i plaited the front of the hair and around the bun just to add some more detail to the look.
I found some beads that looked like oval pearls and a cream ribbon,they both looked very expensive and royal which was the look I wanted to go for.

At first I tried a normal round bun but didn't like the way it looked at the back and you couldn't really  see the ribbon. I then tried rolling the hair in sections which I think looked a lot more detailed and neat. I also plaited little sections around the rolls. I then added the pearls to look almost like a crown, I like the way they sat around the plaits and think it finished the look really well. I then added the ribbon down the center of the rolls just to add a little more detail to the back of the hair so everything wasn't just focused on the front.


CREATING CURLS USING DIFFERENT METHODS

Spiral curls 

 To create the spiral curls you have to section the hair into small parts and then use the tong upwards for every curl, you then grip the roll into place. I tried to do each curl that was next to each other roll the opposite way so once the hair was down it wouldn't all be curled one way. This creates a lovely spiral curl which looks really glamorous. This would be great to use for the Elizabethan hairstyles where she has a few strands at the back coming down which are curled. Next time I would maybe section my pieces smaller to create more curls and leave the tong on the hair a little longer to make sure they all have a nice tight curl.


Barrel curls

This curl is designed to give lift to the hair, starting from the bottom of the hair you take small sections and use the tong on its side. You then pin the curl in place, creating a barrel shape. After we had been taught this technique we were taught how to do it in a brickwork shape which would make the curls a lot neater and give the hair even more of a lift once the curls were took out. It is names brickwork as you form the curls in a brickwork pattern. Once these curls have been let out the volume they give is really good, you don't need any back comb at all.


Comparing the two curls 
As you can see from the picture the barrel curls are much more neater when pinned up. Once the hair is let down you can tell a few notable differences such as the length of the hair, because the barrel curls add volume they actually make the hair much more shorter and the curls tend to stay together and are not as 'pretty' looking as the spiral curls. The spiral curls look lovely around the face and frame it really well, although they don't add much volume, making the curls in different directions works really well to create that finished look where as the barrel curls would have to be made to look better once taken out. 

BUNS AND PLAITS- RESEARCH

After learning the basic techniques of plaits and buns I then wanted to research how these styles were used in both traditional and contemporary forms. At the end of the project we are to combine the two to be able to create an inspired modern version. Therefore I have researched them both separately to see the differences.


Historic plaits and buns 

Although these aren't all historic images they are images of hair that was deeply inspired by the Elizabethan Era. Portraits are really hard to see all the details therefore its great that people have recreated hairstyles so that you can see all of the tiny details and design work of the hair back then. In the actual portraits you can see she has small plaits entwining her bun at the back and her hair is rolled at the front to create a plait-like shape. In the other images you can see the work that really went into the plaits and twists, with jewels in between them and lace threaded through they are truly beautiful hairstyles that definitely represent royalty and wealth.

Modern Buns and Plaits 

Buns and Plaits are used all the time in the modern era. Intricate plaits are associated with bridal hair like the first pictures, they also include buns made up of curls and plaits weaved through. I think its really that plaits were created so long ago and are still used in this day. I love the form of plaiting used in the image on the right which is called weaving, I think this would have suited the Elizabethan hair. Braiding is used often in modern day use especially for African american people to keep their frizzy Afro hair tamed. I'm not sure if Elizabethans used braiding similar but it would of been a good idea to use it before put their large wigs on to keep their hair back and neat.


BUNS AND PLAITS- TECHNICAL

In this lesson we learnt a couple of different looks that will help us when creating our final design, these looks included, buns, plaits, scalp plaits, fishtail plaits. All of these hairstyles were used in Elizabethan times.

Modern Bun 
We first began by creating a classic bun, Lottie wanted to get that 'hair bun' shape without using an actual hair bun. First I tied the hair back into a bobble making sure it was secure, I then sectioned the ponytail into 4 equal parts. For each section I back combed slightly to make sure the parts would stand in place and give the hair a bit more texture. I then rolled it from the middle and gripped it into place. Once i had gripped the four sections I used a fine wave pin to tease the hair and close any gaps, using the pin stops you from being as heavy handed which could ruin the bun. Once the gaps were closed I gripped them into place to secure them. I think my first attempt at a modern bun was quite good as i got a nice round even shape and all gaps were closed. Although I realised I hadn't put the sections in the right place as only one section of hair should of been at the front to prevent any gaps showing when face forward. 


Wrap around bun

To create this bun I started with a ponytail and then had to twist the hair all the way to the bottom of the ponytail and wrap around the hair tie. This creates a very tight bun on the top of the head, to neaten this up so it didn't stand too tall I pulled the top of the bun towards the scalp and pinned it into place, this made the bun look fuller and neater. This style was very easy to do and will come in handy when creating other hair styles. 

Plait bun 

When creating the plait bun I started with a pony tail again as this keeps the hair secure and in place, I then plaited it all the way down and wrapped it around the bobble. I found this really difficult with the length of the dolls hair as the end result didn't look effective at all and looked quite messy. This bun would definitely look better used on long hair as then you would be able to notice it was a plait wrapped around. 

Regular Plait
We then practised with different type of plaits, staring with the regular three strand plait which I knew how to do. I think small ones of these will look really nice weaving through an Elizabethan hair style. 

Scalp Plait
I then created two types of scalp plaits, one on a full head of hair and one on a smaller section. I found the smaller section alot easier because it was neater and tighter. The one on the full head because slightly difficult to keep tight and my end result looked quite loose. The dolls head has different length layers in her hair which I think made the process difficult. 

Fishtail Plait

The fishtail plait was not the most difficult like I thought it would be, but it was quite time consuming. By wrapping the hair around from the bottom it created a lovely fishtail affect. I like to think of this as a 'posh plait' something you may do for a wedding or a party which suits the Elizabethan Era very well as they liked to dress up. 


HISTORIC VS MODERN ELIZABETHAN HAIR

There is a lot of differences between modern interpretations of Elizabethan hair and the real thing, designers tend to make the hair a lot more contemporary for fashion than to stick with the exact hairstyle. 
I am going to look at the two different hairstyles in terms of fashion rather than looking at TV where I think they would try and just copy the hairstyle to exact. Id like to find out more about how different designers have took inspiration from the Elizabethan era and made it their own.. 


Historic Elizabethan 


The colour varies a lot between portraits but is always a shade of red, whether that is a dark auburn colour to a strawberry blonde and it even appears a very light yellow colour. This is because of the dyes used and the different wigs making the colours change a lot. Using a wig will have been better to get that beautiful auburn colour where as using the harmful dyes might have caused the dull yellow colour that appears on the second portrait shown. 

The texture of the hair looks very frizzy and dry, which was a popular trend of the era, meaning they were able to create the large up-do's better. Although in the last portrait the hair looks smoother and in individual curls rather than tight frizz. 

The shape can differ through the Elizabethan era but the hair is normally either very round or heart shaped, this is to create the height and dramatic look. 

The adornments were very important in the hair and as you can see all of these portraits have a lot of little intricate beads and jewels to the hair, they also used feathers and lace to decorate the hair. This gives the impression of wealth and royalty. 


Modern Elizabethan

Where as the colour varied a lot between red shades in the historic portraits, the colour actually varies completely in the modern takes. The colours are always quite bright, like the bleach blonde and the vibrant red used on the bottom photo. The Alexandra McQueen runway photo in the middle was the closest colour hair i found to the actually historic hair. A lot of contemporary images also included really dark hair which I really liked and thought suited the heart shape. 
I think its good to change up the colour so that the piece is only inspired by history not a replica. 

The texture of the hair in most images was either really backcombed or curly, most of the images didn't include any crimped hair but the hair would be more curled and then back combed to add a slight frizz. I love the bottom image as the hair looks really frizzy and represents the Elizabethan era really well but with a modern twist because the hair is down. 

Most of the images I found were styled in the heart shape, i think this is because when changing a hairstyle to contemporary it would be difficult to identify if the shape was round because so many eras did a round shape (eg. a beehive) I loved that the bottom image had the hair down because this made it really modern and looked beautiful with the frizz and vibrant orange curls. 

Contemporary versions didn't actually use a lot of adornments in the hair but instead just chose to create a huge hairstyle with height and focused on a more dramatic detailed makeup. I think this is a shame because their is so much you could do with jewels and other things that would decorate the hair and give it a modern twist. 


Sunday 4 October 2015

INTRODUCTION TO THE PROJECT

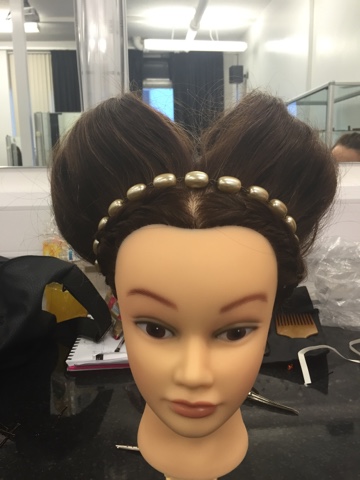
I think the Elizabethan era is definitely one of the era's you remember most for the hair. When researching in the past about Elizabethan hair I remember loving how intricate and detailed the styles were. Embellished with jewels and pearls and even feathers. The colour was also an important factor of the era, the colour symbolized beauty and royalty therefore every women wanted the gorgeous red locks.

The shape was also important, the hair was to look clean and structured. Mostly always in a heart shape or rounded shape and styled to be large and dramatic. They also used plaits and curls to make the hairstyles more intricate, usually the hair was made frizzy and curled to give it texture making it easier to be styled.

 
'Elizabethan Hair Styles for the court were led by Queen Elizabeth. Upper class fashion, which included hairstyles, was highly elaborate - and necessary to achieve attention and success at court. It was referred to as the Peacock age as the Upper class Elizabethan men were often more elaborately dressed than the women and their hair and beards received a similar amount of attention!'http://www.elizabethan-era.org.uk/elizabethan-hair-styles.htm

The hairstyles were made to compliment the fashion of the times, they wore huge neck collars and ruffs that framed their face therefore women wore their hair swept off the face so that it wouldn't interrupt with the clothing. The front and sides of the hair received the most attention as this was the part that was seen the most, the rest of the hair was usually twisted into a bun and embellished with jewels. All Elizabethan women tried to keep their hair as long as possible, the long hair was displayed mostly by the younger women. When a women wore their hair down and flowing it was a sign they were a virgin and it was the preferred hairstyle for a bride on her wedding day so that she looked natural and pure. They would also adorn it with flowers. 

Men were also really particular about their hair in Elizabethan times, they were so conscious about their facial hair they made sure it was shaped and cut on a more than regular bases. 

'The beards could be cut pointed, square, round, oblong, or T-shaped. In the daytime men brushed the beard to keep it in tip-top shape, and at night they often encased the beard in a special wooden press. Beards were considered to be attractive.'
http://www2.springfield.k12.il.us/schools/springfield/eliz/hairstyles.html

So much like now beards were a popular and desired style and alot of men had them. I also found it interesting that men would also dye
their hair the red colour that the women liked. They also had a few most popular hairstyles including the 'love locks' that were spiral curls created with hot irons down to the shoulders. Also as soon as the men turned bald they would always wear a wig, normally of a yellow or white colour. It seems like the men were actually quite feminine and liked to take care of themselves as much as the women of the era did. 

I am excited to learn more about the hair in tudor times and learn all the different techniques that will create such beautiful detailed designs. 


References 
Elizabethan Hairstyles- 
http://www.elizabethan-era.org.uk/elizabethan-hair-styles.htm

Hairstyles in Elizabethan Era-http://www2.springfield.k12.il.us/schools/springfield/eliz/hairstyles.html

Jean Keyes, 1967, A History of Women's Hairstyles 1500-1965, London, Methuen & Co
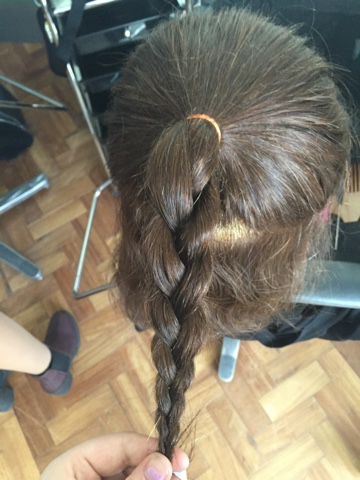